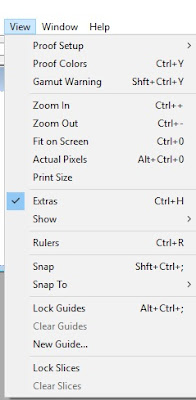
Rulers, Guides and Grid:
Rulers help you position images or elements
precisely. When visible, rulers appear along the top and left side of the
active window. Markers in the ruler display the pointer’s position when you
move it. Changing the ruler origin (the (0, 0) mark on the top and left rulers)
lets you measure from a specific point on the image. The ruler origin also
determines the grid’s point of origin.
Guides and the grid
help us position images or elements precisely. Guides appear as non-printing
lines that float over the image. we move and remove guides. We also lock
them so that they don’t move.
The grid is useful for
laying out elements symmetrically. The grid appears by default as non-printing
lines but can also be displayed as dots.
Applications
of Guides and Grids:
Selections, selection
borders, and tools snap to a guide or the grid when dragged within 8 screen (not image)
pixels. Guides also snap to the grid when moved. We can turn this feature on
and off.
Guide spacing, along with guide and grid
visibility and snapping, is specific to an image.
Grid spacing, along with guide and grid color
and style, is the same for all images.
Choose View > Show > Guides.
Choose View > Show > Ruler.
Choose View > Extras.
This command also shows or hides layer edges, selection edges, target paths,
and slices.
Change a ruler’s zero origin:
Choose View > Snap To, then choose any
combination of options from the sub menu. This snaps the ruler origin to guides,
slices, or document bounds. We also snap to the grid.Position the
pointer over the intersection of the rulers in the upper-left corner of the
window, and drag diagonally down onto the image. A set of cross hairs appears,
marking the new origin on the rulers.
Place a guide:
If
the rulers are not visible, choose View > Rulers.
Do one of the following to create a guide:
Choose View > New
Guide. In the dialog box, select Horizontal or Vertical orientation,
enter a position, and click OK.
Drag from the horizontal ruler to create a
horizontal guide.
Remove guides from the image:
To
remove a single guide, drag the guide outside the image window.
To
remove all guides, choose View > Clear Guides.


Drive more Traffic to website.simple ways to increase the amount of traffic that you are getting to your website or Blog to become brand
ReplyDeleteDrive more Traffic to websiteGet SEO Driven Organic traffic to your website.
Though the technical glitch scared a lot of people. It was just a publicity stunt to make the event even more interesting. The intention was good the question is. Is it necessary to make a fuss just before the big event? I don't think so.jogos friv gratis 2019
ReplyDeleteJogos 2019
jogos friv
abcya free games only
Its like you read my mind! You appear to know so much about this, like you wrote the book in it or something. I think that you could do with some pics to drive the message home a little bit, but other than that, this is excellent blog. An excellent read. I'll certainly be back. apple service provider berlin
ReplyDelete